Cloud Recorder
The Cloud Recorder is a primary module of the Cloud Recording System. It is responsible for capturing the local user's volumetric data, managing the upload process to the cloud, and controlling the visual feedback of the user's own representation through a multi-phase pipeline.
Step-by-Step: Recording Yourself
1. Scene Integration
- Create the Manager: Create an empty GameObject in your scene named
[CloudRecorder]and attach theCloudRecorderControllercomponent. - Dependency Setup: Ensure the
Trafofield is assigned to aTrafoDistributor. If left empty, the controller will attempt to find one on the same GameObject during startup.
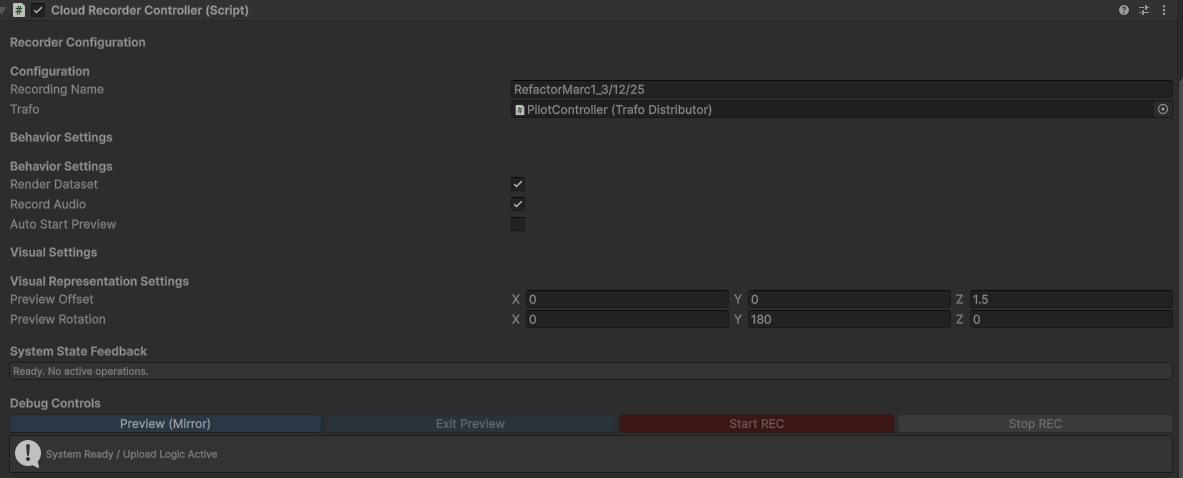
Figure 1: The CloudRecorderController Inspector view.
2. Configuration
Before playing, adjust the following parameters in the Inspector:
- Recording Name: The default filename for your upload.
- Preview Offset: Where your "Mirror" hologram will appear during setup (e.g., 1.5m in front).
- Preview Rotation: The orientation of the mirror hologram (usually 180° on Y to face you).
- Render Dataset: (
public bool RenderDataset = true;) Determines whether to render your volumetric dataset locally outside of Preview Mode. Disabling this saves resources and is purely visual; it is highly recommended for scenes dedicated solely to recording where seeing yourself outside of the mirror mode isn't necessary. - Record Audio: (
public bool RecordAudio = true;) Allows you to toggle audio recording directly from the inspector. - Auto Start Preview: (
public bool AutoStartPreview = false;) If activated, the preview phase (rotation + offset) will trigger automatically when the scene starts.
3. Editor Visual Feedback
The Class Editor for the CloudRecorderController provides real-time system state feedback using a color-coded logic:
- Green: Indicates successful operations or active recording without issues.
- Yellow/Orange: Indicates that a process requires attention, such as a paused recording or an ongoing cloud upload.
- Red: Highlights critical issues, such as a connection error to the orchestrator.
4. The Recording Flow
The recorder transitions through specific phases to ensure ease of use and technical accuracy:
- Phase 1: Preparation (Mirror Mode): If
AutoStartPreviewis set to false, click the "Preview (Mirror)" button. The system enables your renderer and moves it to thePreview Offset. This allows you to check your position and framing before recording. If you decide not to proceed with the recording, you can click the "Exit Preview" button to return to the initial state and conclude navigation. - Phase 2: Recording: Click "Start REC". The hologram instantly snaps back to the origin
(0,0,0)to ensure the recording is spatially aligned with the world coordinate system. - Phase 3: Completion: Click "Stop REC". The representation is hidden, and the upload process begins automatically.
Developer Implementation
The controller is fully abstracted and can be driven via script. It exposes events for recording states and upload progress.
using Holo.Recording.CloudRecording;
using UnityEngine;

public class RecorderExample : MonoBehaviour {
    public CloudRecorderController controller;

    public void StartMyRecording() {
        // Enters Mirror Mode first
        controller.EnterPreviewMode();

        // Starts the actual recording
        controller.StartRecording();
    }
}
Troubleshooting
Hologram Not Hiding: Ensure your player prefab has a NetworkPlayer component in its hierarchy. The recorder uses this to safely identify the local renderer.
Upload Status: If using the sample UI, look for the "Traffic Light" feedback: Yellow (Uploading), Green (Success), or Red (Failed).