Unified Menu System
1. Overview
The Unified Menu System is the core architecture within the HoloMIT SDK for creating and managing User Interfaces (UI). Its design is based on an MVC (Model-View-Controller) structure, allowing developers to configure menus once and deploy them dynamically across multiple platforms, natively supporting both Desktop (2D PC) and Virtual Reality (VR).
The system consists of a unified central controller (SystemMenuController) acting as the action database, and multiple "Views" (DesktopMenuView and VRWristMenuView) that interpret and render this data based on the user's hardware.
2. SystemMenuController (Central Controller)
This is the brain of the menu system. It operates under a Singleton pattern (SystemMenuController.Instance), allowing any UI instantiated at runtime (e.g., a spawned multiplayer player prefab) to connect to it and fetch button configurations without breaking references.
2.1. Inspector Reference
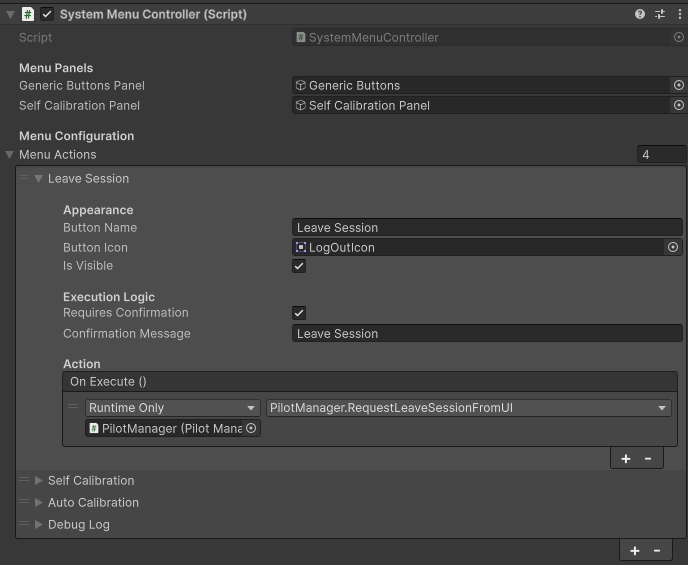 Figure 1: The SystemMenuController component in the Unity Inspector. Shows the panel configuration and the dynamic list of Menu Actions.
Menu Panels
(Note: These hardcoded panel dependencies are temporary and will be abstracted in future versions. See Section 8).
- Generic Buttons Panel (GameObject): The UI container where the auto-generated buttons will be grouped and instantiated.
- Self Calibration Panel (GameObject): A static, pre-designed panel containing complex interfaces (sliders, toggles) that are not generated via code. The controller manages the transition between this panel and the generic buttons.
Menu Configuration
- Menu Actions (List): The central database of your menu. This is where developers configure what buttons exist, their appearance, and the code they execute, using the
MenuActionConfigdata model.
2.2. Public API Reference
public List<MenuActionConfig> GetActiveMenuActions()Returns a filtered list containing only the buttons marked as visible. Called by the Views upon initialization.public void OpenCalibrationPanel()/ReturnToMainMenu()Toggles the visibility between the main menu and the static calibration panels.public void RequestCalibrationMenuOpen()Triggers the global eventOnCalibrationMenuRequested. Ideal to be called from Inspector UnityEvents to safely communicate with instantiated prefabs.
3. MenuActionConfig (Data Model)
To avoid manually creating buttons on a Canvas, the system uses serialized configurations. Each element in the Menu Actions list of the SystemMenuController represents a button.
3.1. How to Add a New Button (Step-by-Step)
Adding a new button to the UI is entirely done through the Unity Inspector, without touching any UI Canvas or Prefab:
- Select the
SystemMenuControllerGameObject in your scene. - In the Inspector, locate the
Menu Actionslist. - Click the
+icon at the bottom right of the list to add a newMenuActionConfigelement. - Expand the new element and configure its Appearance:
- Type the Button Name (e.g., "Reset Session").
- Assign a Button Icon (optional).
- Ensure Is Visible is checked.
- Configure its Execution Logic:
- If this is a destructive action, check Requires Confirmation and type a warning message (e.g., "All unsaved progress will be lost. Continue?").
- In the On Execute () UnityEvent box, click the
+sign. - Drag the target GameObject/Script into the empty slot and select the method you want to execute from the dropdown menu.
- Play the scene. The button will automatically appear across all instantiated views (Desktop, VR, and any custom views you have created)!
Detailed Property Breakdown:
- Button Name (string): The visible text on the button.
- Button Icon (Sprite): Optional icon. It can be used alongside text or independently.
- Is Visible (bool): If unchecked, the button will not be generated in the final view, allowing options to be hidden during development without deleting the logic.
- Requires Confirmation (bool): If active, clicking the button will not execute the action immediately. Instead, it will open the
GenericConfirmDialog. - Confirmation Message (string): The warning text displayed in the dialog.
- On Execute (UnityEvent): The event fired when the button is clicked (or after accepting the confirmation dialog).
4. UI Views (Cross-Platform Rendering)
The "Views" inherit from the abstract class BaseMenuView, which contains the common logic to instantiate button prefabs (GenericButtonView) and connect them to the confirmation system (GenericConfirmDialog).
4.1. DesktopMenuView
Implementation designed for 2D screens (PC/Mac).
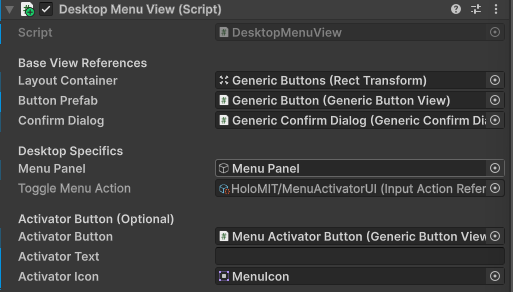 Figure 2.1: DesktopMenuView configuration. Allows mapping the specific input action (the "X" key) to open the menu and customizing the floating activator button.
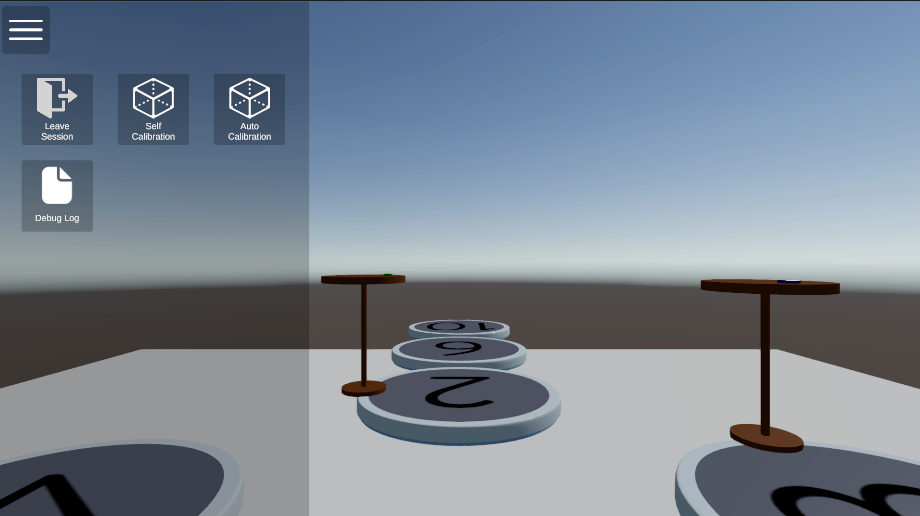 Figure 2.2: DesktopMenuView Example.
- Menu Panel: Reference to the background and main container of the 2D menu.
- Toggle Menu Action: Integrates Unity's new Input System to open/close the menu via keyboard (mapped to the "X" key).
- Activator Button: A permanently visible, small floating UI button used to deploy the menu with the mouse. When opening the menu, this view automatically manages unlocking and showing the system cursor (
Cursor.lockState).
4.2. VRWristMenuView
Volumetric implementation designed for Virtual Reality, meant to be anchored to the player avatar's wrist.
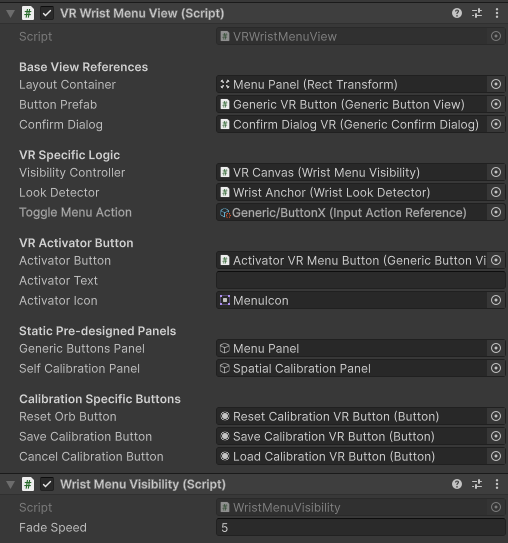 Figure 3.1: Advanced VR wrist menu configuration, integrating physical gaze systems, the "X" button controller mapping, and static calibration panels.
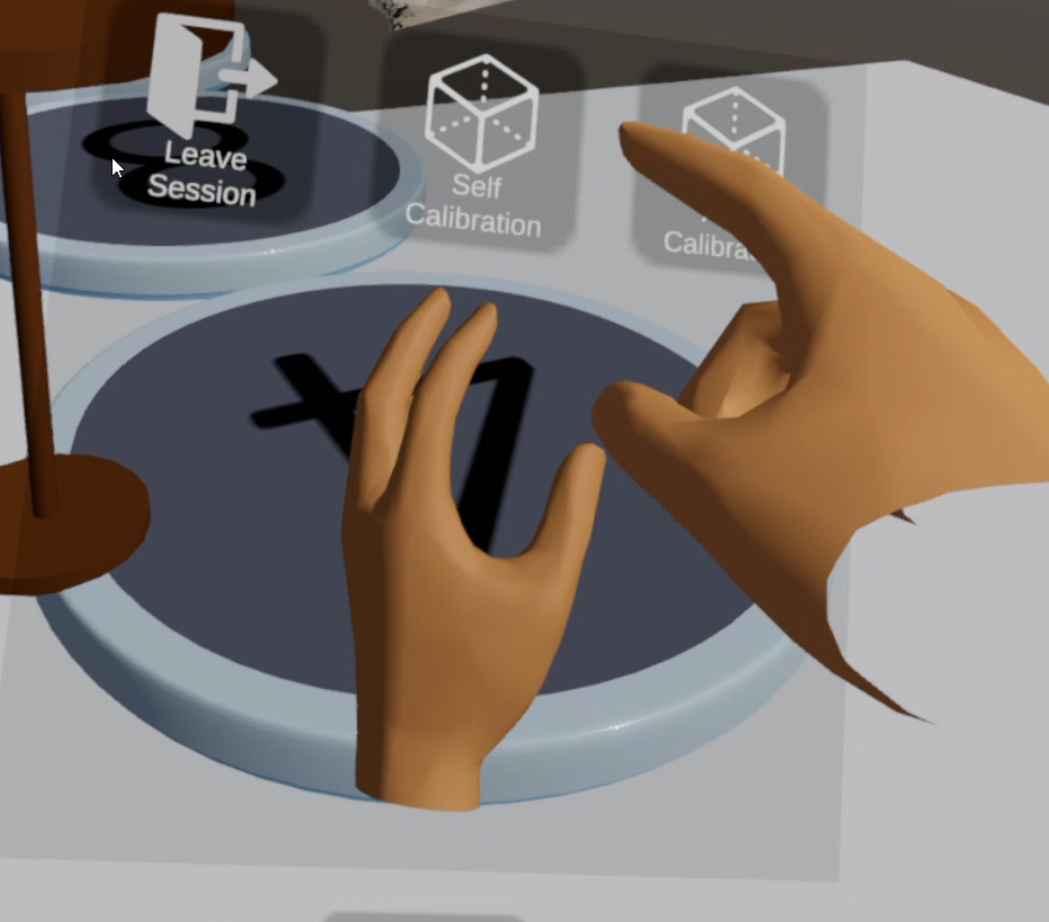 Figure 3.2: Advanced VR wrist menu preview.
- Toggle Menu Action: Maps the menu opening action to the VR Controller (mapped to the "X" button on Meta controllers).
- VR Activator Button: A floating holographic button the user can physically press with their virtual finger. Unlike the Desktop version, this button only appears when the menu is closed AND the user is looking at their wrist.
- Static Pre-designed Panels & Calibration Buttons: Allows mapping internal references (Reset, Save, Cancel) of the static calibration panels. Upon initialization, it injects logic via code (C# delegates) to interact with the
Calibration.LocalInstanceSingleton, ensuring references are not lost in network-instantiated Prefabs.
4.3. Creating a New Custom View (e.g., Mobile Android)
Because of the MVC architecture, creating a new UI for a completely different platform (like a mobile touchscreen) is straightforward. You only need to create a new View; the central controller and data remain untouched.
Step-by-step Guide:
- Create the Script: Create a new C# script (e.g.,
MobileMenuView.cs) that inherits fromBaseMenuView. - Handle Input: Implement your platform-specific input logic (e.g., detecting a screen tap to toggle the menu visibility).
- Fetch Data: In your
Start()method, check forSystemMenuController.Instance, fetch the active actions, and pass them to theBuildMenu()base method.
using System.Collections.Generic;
using UnityEngine;

namespace Holo.Core
{
    public class MobileMenuView : BaseMenuView
    {
        [Header("Mobile UI")]
        [SerializeField] private GameObject mobilePanel;

        private void Start()
        {
            // 1. Fetch data from the Singleton dynamically
            if (SystemMenuController.Instance != null)
            {
                List<MenuActionConfig> activeActions = SystemMenuController.Instance.GetActiveMenuActions();

                // 2. This base method auto-generates all the buttons!
                BuildMenu(activeActions);
            }
        }

        // 3. Add your touch-input logic to show/hide the mobilePanel here...
    }
}
- Setup the Prefab: Create a new UI Canvas in Unity, attach your new
MobileMenuViewscript. - Link References: Assign the required base references in the inspector (
layoutContainerfor the layout group,buttonPrefabfor your custom mobile button design, andconfirmDialog). The system will handle the rest!
5. VR UX Modules (User Experience Modules)
To ensure the VR menu feels organic, the wrist view relies on two critical sub-modules that handle spatial interaction:
5.1. WristLookDetector
Calculates the spatial orientation between the player's wrist and their head.
- Main Camera: Dynamically finds the main XR camera (
Camera.main). Its logic gracefully handles camera loading delays common in VR frameworks. - Activation Tolerance Angle (float): The vision cone (in degrees) within which the user is considered to be "looking" at the wrist (default: 45º).
- Logic Flow: Provides a public property
IsCurrentlyLookingthat the menu constantly polls to decide whether to show or hide the holographic activator button.
5.2. WristMenuVisibility
Replaces abrupt panel toggling (SetActive) with smooth, immersive transitions.
- Requires a
CanvasGroupcomponent on the UI. - Uses a coroutine (
FadeCanvas) governed byFadeSpeedto animate the UI's Alpha value. - Automatically blocks interaction Raycasts when the panel is invisible, preventing ghost clicks.
6. Auxiliary Components (Reusable Elements)
The system uses modular UI components to facilitate maintenance:
GenericButtonView: The base prefab for all buttons. It auto-configures itself (text, icon, events) and automatically hides graphic elements that are not being used (e.g., if a button only has text and no icon).GenericConfirmDialog: A generic modal warning panel. It intercepts the user's action, displays the configuredConfirmationMessage, and only executes the UnityEvent if the user clicks "Confirm", closing itself automatically.
7. Setup Guidelines & Common Pitfalls
When configuring new UI Canvases (especially for VR), Unity's default UI system can cause silent interaction bugs if not set up correctly. Keep the following rules in mind:
- VR Input Module: Do NOT use Unity's standard
Standalone Input ModuleorUI Input Modulein your EventSystem if you are targeting VR. You MUST replace it with theXR UI Input Module. Otherwise, your laser pointers and direct pokes will be ignored. - Graphic Raycaster: Ensure that the root Canvas of any Menu View has a
Graphic Raycastercomponent attached. Without this, the Canvas cannot detect any raycasts from controllers or mice. - Raycast Blocking (Invisible Walls): If your buttons are not responding, check your UI hierarchy for transparent or decorative images (like backgrounds or spacers). Ensure that the Raycast Target checkbox is set to
falsefor any UI element that is not meant to be interacted with. A transparent image over a button will block the raycast. - Physical Poking in VR: To interact with World Space UI buttons physically (touching them with the avatar's finger), the player's hand controller needs an
XR Poke Interactorcomponent configured properly, along with a Collider that acts as the physical interaction tip.
8. Future Roadmap & Next Steps
The Unified Menu System is actively evolving. The following architectural upgrades are planned to increase modularity and scalability:
- Abstract Panel Routing: Currently, the
SystemMenuControllerholds hardcoded dependencies for specific panels (such as the Generic Buttons and Self Calibration panels). A planned update will abstract this routing directly into theMenuActionConfig. Developers will be able to drag and drop a target UI Panel directly into the button's configuration in the Inspector, making the central controller completely agnostic to the panels it manages. - Categorized Tab System: To prevent UI clutter as the application grows, the current single-panel layout (where all buttons coexist) will be upgraded to a Tab-based architecture. Menu actions will be categorized into dedicated main tabs (e.g., General, Session Settings, Calibration Settings, User Settings), providing a cleaner and much more scalable User Experience.