Orbbec Cameras and Sync
Model used: Femto Bolt
See Capturer Hardware list for a list of the materials used.
Updating the Firmware
Orbbec Synchronization Using Hub
Set Up the Cameras
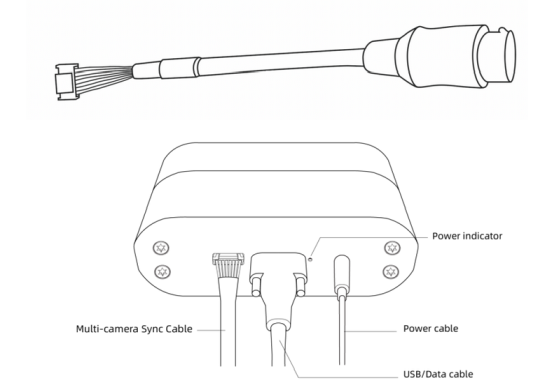
Cameras should be connected:
- to the host PC with USB3.0 cables
- to power using the provided power cables
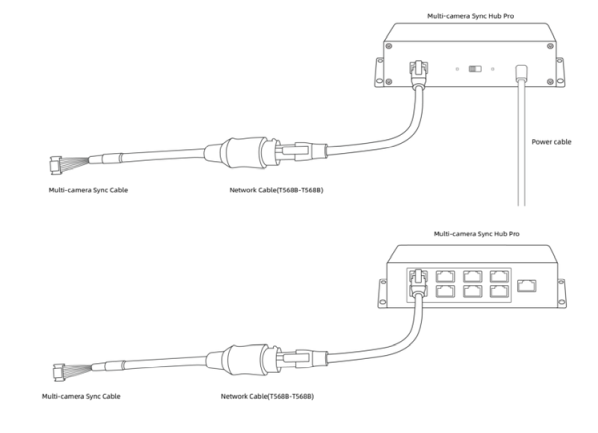
- to the sync hub pro using the adapters + ethernet cable
- One to the primary slot
- The rest to the secondary slots at the other side of the hub
See images from Orbbec's website:
Selecting the Primary Device
The sync configuration is written to the flash memory of the devices. Using it very frequently will reduce the lifetime of the memory, so it's important to change the configuration as little as possible.
Two main things should be taken into consideration:
- If multiple subsets of cameras are required, select as primary one device that will be in all of them. The sync cables would also need to change, so it's better if the primary device is stable.
- When running calibration, make sure to give the primary device serial number in the camera config used (see Capture Configuration).
Camera Delay
Since the cameras use active pulses to compute depth, even when synchronized, devices should have a slight delay between them so they don't interfere with each other. Docs
To prevent potential interference when pointing in the same direction, a minimum delay of 160 microseconds is recommended. The actual pulse width is 125μs, but we declare it as 160μs to provide some leeway. Taking the NFOV resolution as an example, each 125μs pulse is followed by 1350μs of idle time. The purpose of staggering the exposure of two devices is to have the first pulse of the second camera fall within the first idle period of the first camera. The delay between the first and second cameras could be as low as 125μs (pulse width), but we recommend allowing some margin, thus 160μs. Given 160μs, you can stagger the exposure periods of up to 8 cameras at most. (In an eight-camera setup, a one-master-seven-slaves mode is adopted.)
This delay is added automatically in the code. For this reason, it is better that the first time cameras are configured for synchronization, the setup with the maximum number of cameras is used. If more cameras are needed later, force the configuration (see Capture Configuration).
Checking the Configuration
Using the OrbbecViewer and selecting the cameras, you can see their synchronization configuration mode and delay.
Note that if a camera is set up as secondary it will not start unless the primary camera also starts. You can do so by using a second instance of the viewer.
Capture Configuration
When the cameras should run using synchronization, the capturer needs to be told the primary device. Two options are given:
- Each device has its own configuration:
{
  "config": {
    "serial1": {
      "device": {
        "primary": true,
        "color_gain": 20
      }
    },
    "serial2": {
      "device": {
        "color_gain": 30
      }
    }
  }
}
- All devices are configured using the same parameters:
{
  "config": {
    "general": {
      "device": {
        "primary_serial": "serial1",
        "color_gain": 20
      }
    }
  }
}
The second option is probably the easiest and most common to use.